
How to Add Agents to Your IVRSolutions Panel (Step-by-Step)
In this tutorial we will guide you on how you can add agents in Ivr Solutions through your admin portal.
Adding agents to your IVRSolutions panel is one of the first steps in setting up your call management system. Agents are the people who will attend calls, handle customer queries, and ensure smooth communication with your clients. By adding agents to the panel, you can assign extensions, monitor their performance, and streamline the entire call flow. The process is quick and easy, and in this guide, we’ll walk you through each step so you can start managing your team effectively right away.
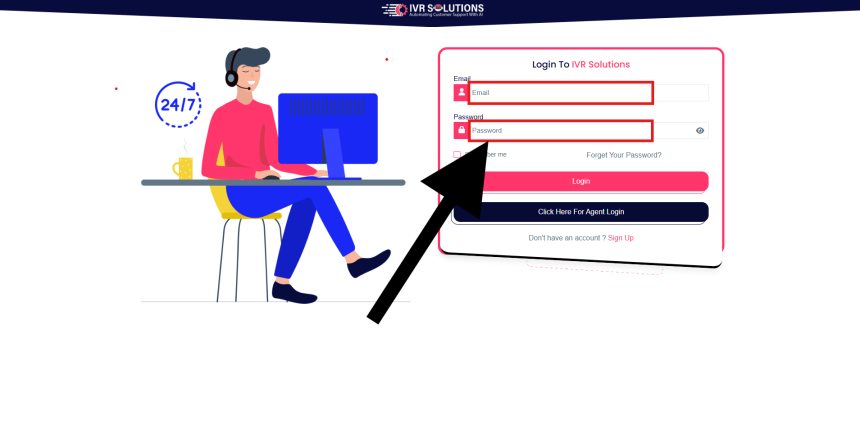
Step 1: Login to Your Admin Dashboard
Begin by logging into your IVRSolutions admin account. Use your registered email and password to access the panel.
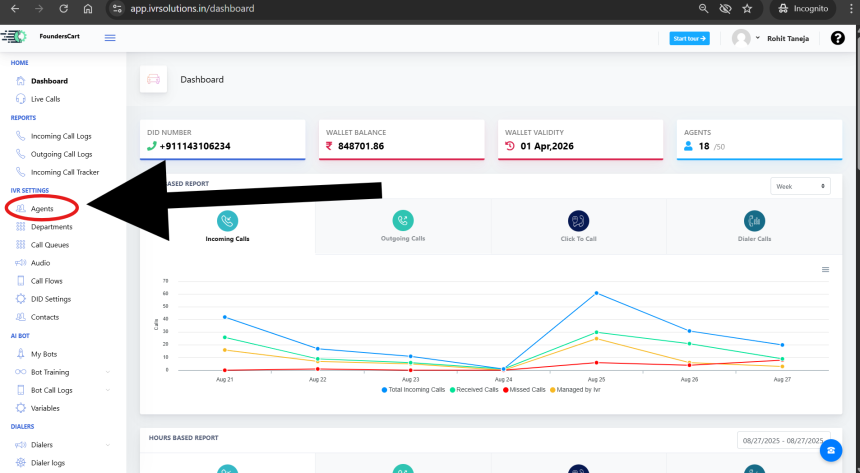
Step 2: Navigate to the Agents Section
Step 2: Navigate to the Agents Section
Once inside the dashboard, look for the Agents tab on the left-hand side menu. This is where you can view, manage, and add new agents.
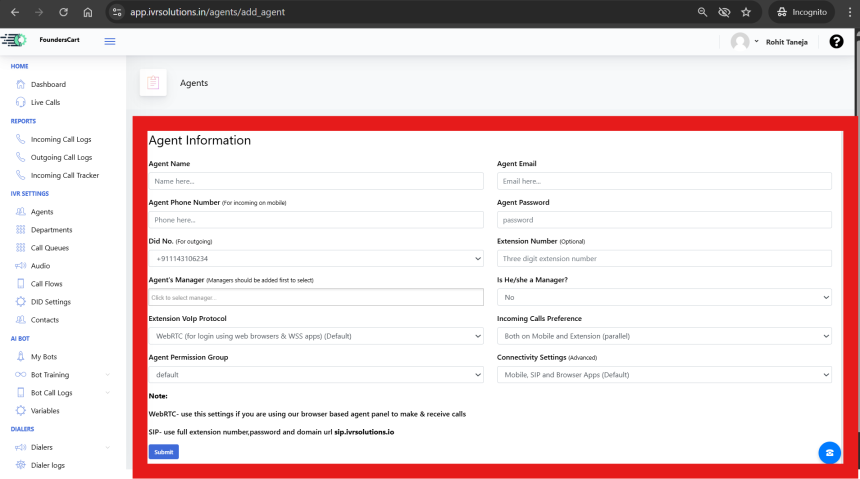
Step 3: Click on “Add Agent”
In the Agents section, click the Add Agent button. This will open a form where you can enter the details of your new agent.

Step 4: Fill in Agent Details
Provide the necessary details for the agent, such as:
- Agent Name (e.g., Sumit Sharma)
- Agent Email Address (used for login/notifications)
- Agent Phone Number (used for login/notifications and to receive calls)
- Agent Password (used for login)
- Did No. - If you want to make outgoing calls then you can assign a default DID to this agent.
- Extension Number or DID (Optional - unique to each agent)
- Agent's Manager (Use this if there's any manager to this agent who can see the calls, etc of this particular agent)
- Is He/she a Manager? - Select Yes if he's a manager and vice-versa.
- Extension VoIp Protocol -
- WebRTC- use this settings if you are using our browser based agent panel to make & receive calls.
- SIP- use full extension number,password and domain url sip.ivrsolutions.io
- Incoming Calls Preference:
- Both on Mobile and Extension Parallel : Use this option if you want your agent to receive calls both on mobile number and extension(mobile app/webapp/browser,etc) simultaneously.
- First On Extension Then on Mobile : Use this option if you want to give first priority to the extension and if agent doesn't answer on extension then call will go to their mobile number. This is the most used method as it's cost effective and usefull.
- Only on Extension : Use this if you don't want your agent to use their mobile phones. This option will make calls only through Extensions (mobile app/webapp/browser,etc)
- Only on Mobile : Use this option if you want your agent to answer calls only through their mobile phone.
- Connectivity Settings (Advanced)
- Mobile, SIP and Browser Apps(Default) - Keep it as it is if you are not using your Landline with IP.
- Landline(IP Whitelisting Required) - Use this option if you use your own Landline Software with spefic IP.
Make sure all mandatory fields are filled before moving forward.
Step 5: Save and Verify
Click the Save button to add the new agent. If successful, the agent will now appear in the list of available agents.
How to Set Up a Basic Call Flow in IVRSolutions
A call flow defines what happens when a customer dials your number. It determines whether...
How to Use the "Login as Agent" Option in Your IVRSolutions Panel
Sometimes, administrators need to see exactly what an agent is experiencing inside the IVR...
How to Manage Working Hours of Agents in Your IVRSolutions Panel
Managing agent working hours is essential to ensure that calls are routed only when your t...
How to Add and Manage Audio in the IVRSolutions Panel
Audio messages are the backbone of your IVR system. They are used to greet customers, play...